Hacking Preferences and Documents

Photoshop, ImageReady, and Bridge all use preference files to store application settings. For example, the Adobe Photoshop CS2 Prefs file contains all the options for general display; history logs; file saving; cursor; transparency and gamut; units and rulers; guides, grids, and slices; plug-ins and scratch disks; and memory allocation. The file lives in the Adobe Photoshop CS2 Settings folder, along with a host of other files that keep track of your Preferences and settings, such as Color Settings, New Doc Sizes, and so forth. Settings for Adobe Camera Raw, Save for Web, and paths are kept separately in the Registry by Windows, whereas the Mac OS keeps them in the Preferences folder, located in the user's Library folder.

Restoring Prefs

When you are satisfied with your customizing of Photoshop, it's a good idea to save the Adobe Photoshop CS2 Settings folder. You can find the folder in the following location for Windows and Mac OS, respectively:

C:\Documents and Settings\Administrator or UserName\AdobePhotoshop9.0\Adobe Photoshop CS2 Settings.

Macintosh\HD\Users\UserName\Library\Preferences\Adobe Photoshop CS2\Settings

To understand the rationale behind the decision to save the settings folder, you have to know how Photoshop makes use of the files and that, occasionally, you have to delete them. Each time Photoshop closes in an orderly fashion, it updates the settings files that need updating, saving any modifications that you may have made; for example, you may have added new actions or made changes to the color settings, in which case the files relating to the Actions palette and Color Settings are updated. If Photoshop quits unexpectedly, any customized settings made since Photoshop was last closed are lost. However, occasionally, even if you quit in an orderly fashion, Photoshop may start to behave erratically. If that happens to you, you have two choices: either you can delete the settings files and let Photoshop create default settings files or you can replace the files with the saved files, hence the need to save the settings folder. To delete Prefs, take the following steps: Immediately after launching Photoshop or ImageReady, hold down Ctrl+Alt+Shift (Windows), Ф+Opt+Shift (Mac OS). You will be presented with a dialog box (Figure 5-1); make your choice and click the OK button.


Figure 5-1: The dialog box that appears when you use the modifier keys to launch Photoshop to replace the currents Prefs with factory default settings.

If the problem disappears, you can then replace the default Prefs with the saved files and reset any Preferences that were changed since you saved the Adobe Photoshop CS2 Settings folder. If the problem returns, as it can sometimes, revert to the default settings, customize them again and then resave the settings folder.

Changing Scratch Disks and Plug-Ins at Launch Time

To select an alternative scratch disk, press Ctrl+Alt (Windows), Ф+Opt (Mac OS) immediately after launching Photoshop.

If you have plug-ins installed in more than one folder, you can select an additional plug-ins folder by pressing Ctrl+Shift (Windows), Ф+Shift (Mac OS) immediately after launching Photoshop.

Specifying Update Prefs

If Bridge and Photoshop irritate you when they periodically check for the latest updates, chances are you have not clicked on the Preferences button in the Adobe Updater dialog box when it has finished checking. To do so, choose Help>Updates in either application and then, after the Adobe Updater has finished checking for new updates, click the Preferences button. Doing so opens the Adobe Updater Preferences dialog box (Figure 5-2). In the dialog box, you specify how you want to check for and where to download any available updates for Photoshop, Bridge, Help Center, and Stock Photos.
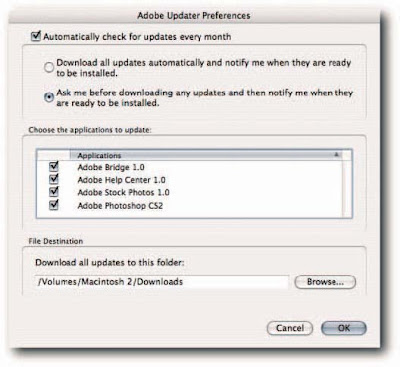


Figure 5-2: The Adobe Updater Preferences dialog box lets you control how and when it checks for updates, where it downloads the files to, and how it deals with the installation.

Installing Plug-Ins into a Safe Folder

Installing plug-ins into the default plug-ins folder in the Adobe Photoshop CS2 folder is quick and painless. Just point the installer to it and sit back. However, saving a little time when installing can cost a lot more time down the line. For example, when you need to reinstall Photoshop, it's easy to accidentally delete the plug-ins folder even though you had every intention of keeping it (especially on Mac OS, where dragging application folders to the Trash is a common practice).When you come to upgrade Photoshop to the next version, you may find that you have to reinstall some if not all the plug-ins because you cannot just copy them into the new version. If you do, some of them are sure to require a reinstall, owing to the name change of the top-level folder. It all adds up to a loss of time. To avoid reinstalls and save time, you can take advantage of a little known Photoshop functionality. If you drop a shortcut (Windows) or alias (Mac OS) into any of the folders within the application folder, Photoshop can see the path and find the folder at the end of it. Therefore, by installing the plug-ins once into a designated folder away from the main Photoshop folder, creating a shortcut/alias to it, and then dropping it into the plug-ins folder, you can do away with the need to reinstall and reduce the chance of accidentally deleting the folder. You can even create shortcuts/aliases from the individual plug-ins and drop those into the plug-ins folder one at a time. That way, you can control how many plug-ins load into memory each time you launch Photoshop. Furthermore, if you don't fancy making shortcuts/aliases, you can simply choose the designated folder in Preferences>Plug-Ins & Scratch Disks as the Additional Plug-Ins Folder and have Photoshop find it automatically at launch time.

Text Reflection Effect

Today I am going to make a tutorial for the text reflection. Actually I think you may also use this technique in other design for the reflection purposes. Let's start then. Open the PS for sure then open a document and we need it in 400px X 200px with white background.

1. Create a new layer, rename as gradient_background, with gradient tool, set the foreground color to #999999 and the background color to white (#ffffff). Drag from the bottom to the top of the stage and you may get something like this:


2. Select the horizontal type tool and write something there and here I write LOONDESIGN. I use supersonic font for this typing with white color.


3. Double click on the text layer to bring out the layer blending option and we need to set the stroke and gradient overlay option like below:


4. Ctrl + J to duplicate the text layer then right click on the copy layer and select Rasterize. Right click again and select clear layer style. Ctrl + T to bring out free transform option and right click on the stage and select flip vertical. Adjust the position and you will get something like this:


5. Select the rasterized layer again, press "Q" on your keyboard to use the Quick Mask Mode function. Select gradient tool, drag by holding shift like shown below. Press "Q" again and press Delete once. Set the layer opacity to 60%.


6. Create a new layer below all layers but above the gradient_background layer. Take Elliptical Marquee Tool and draw a circle as the image below shows.


7. Fill it with black color then go to Filter > Blur > Gaussian Blur 2. Now adjust the layer to get the desired effect and change the Opacity to 30%. And you are done!


Now you can tune or set the text effect via the layer blending option and the gradient_background color with gradient tool. have fun!

Photo Retouch Using Unsharp Mask

Unsharp Mask For Scanned Slides and prints

Due to the nature of how a scanner 'reads' and interprets information from a slide, we are often required to adjust things somewhat in various image editing software to compensate for how the scanner delivers us the file. So I introduce to you, the Unsharp Mask filter in Adobe Photoshop.

Due to a phenomenon called 'spill-over' the pixels are blurred somewhat during the process of the scan. This is normal. We can compensate for this in Photoshop.

However we want to only affect the lightness or brightness of the image not the entire image. This is the best way to affect the sharpness of the image without bringing out too much 'grain'. In order to do this we must use 'channels'.

We are going to use Lab color mode in order to accomplish this simple because it divides its channels (color info) into Lightness, a, and b.

Step 1

You will need a full color image from a scan. Remember do not use any of the scanners software to adjust anything, do it all in Photoshop.

The sharpening process should only be applied after you have completed all the other modifications you need to do...its the last step.


Step 2

Convert the image to Lab color.

Image --> mode --> Lab color

Step 3

Click on the 'Channels' tab in the layers pallete.

You should see something similar to what is shown below.


Step 4

Select Lightness Channel

Click on the channel labelled 'Lightness'. You will also notice the image goes to a greyscale. That's normal.


Step 5

Apply Unsharp Mask
Go to Filter -- Sharpen -- Unsharp Mask

Follow the basic suggestions below:
Amount: 120% to 220% (image varies)
Radius: 1.0 to 1.2 pixels
Threshold: 0

When you have the results you like click OK.

Step 6

Compare

Below is a quick compare of the two versions in the lightness channel.


Step 7

Convert image back to RGB

Image --> mode --> RGB

Its done now. You should have seen some improvement. Althought the effects are similar if the filter is applied to the whole image, applying it to the brightess or lightness is really the best method.

What are Adjustment Layers?

Adjustment layers are special layers in Photoshop that will apply an "adjustment" onto its own layer. There are many adjustments you can make to a layer, such as: color balance, levels, hue/saturation, etc. You create an adjustment when you feel an image needs a deliberate change or modification to your choosing. Adjustments can quickly and easily enhance your digital or scanned-in photographs and are used all of the time in creating great, layer-based graphic design.


There are basically two ways to do things. Adjustments and adjustment layers.

1. You can create an adjustment on an actual layer itself (by going under Image: Adjustments: and then choosing an adjustment). Note: adjustments will not work on shape layers (vectors). In this case you'll want to make duplicate the original layer before you make any adjustments or changes.

2. You can create an adjustment layer on top of an original layer. This preserves the original layer, as you can easily discard the adjustment layer.

If you are a beginner, you'll want to be careful. Always make sure that if you are making an adjustment on a layer itself that you are certain you want to keep that adjustment. To play it safe you should always duplicate the original layer if you are going to make adjustments or try out some filters. But you can easily just create an adjustment layer instead by clicking on the adjustment layer icon on the bottom of the layers palette.

When you create an adjustment layer, it will apply to all of the layers beneath it. For example if you had 20 layers of a complex design and wanted to change the color balance of all of the layers (the entire document) you would select the top layer in the layers palette and then create an adjustment layer: color balance and then it will apply to all of your image. You can move that adjustment layer down and layers on top of it in the palette won't be affected. Remember that it applies to all of the layers beneath it.

What I have just talked about is creating an adjustment layer that will spread across the entire space of the document. Because you have not made a selection, an adjustment layer will spread across the document on its own special layer. If you make an adjustment ON a specific layer, it will just apply to that layer.

Now..if you want an adjustment layer to apply specifically to a certain layer (instead of the entire document) for the same effect as creating an adjustment on the layer itself; what you have to do is simply Ctrl or Cmd click on the layer icon and get the layer selected so you see the marching ants. Then what you do is simply create an adjustment layer of your choice (from the icon) and it will only apply to the selected areas of the layer immediately beneath it (because no other layers are in between it).

This is the same effect as creating an adjustment on the layer itself except more flexible because you can easily adjust the adjustment layer attributes (by double clicking on the adj. layer) or simply throw it away or hide it if you don't like it. You may want to consider trying different adjustment layers on a layer but remember you have to select the layer itself first otherwise the adjustment layer will apply across the entire document.

You may also have to do some layer masking as certain adjustments will create harsh and distinct differences from the rest of the document. Remember there are these two ways to do the same thing but if you can get comfortable with creating and using adjustment layers, they are going to save you some time. Consider putting several layers of adjustments in a layer set for better organization. I personally use adjustment layers all of the time and they are used religiously in designs such as movie posters and flyers.

Water Spirit - Drawing Fire

This tutorial will show You how to place a fire on someone's hands.

First, we have to chose a photo for our future work. I've picked this one. When You open Your photo in Photoshop make first step: Image -> Adjustments -> Desaturate (Shift + Ctrl + U). That will be our base image (I'll resize it to 450x600 px for presentation - You may work with larger image if You want.


Now we will add a Adjustment Layer called Levels. Hold Alt Key, and click on Adjustments Layer button on Layers Palette. Select Levels. Make Sure that Use Previous Layer to Create Clipping Mask is sellected. Then just slide dark arrow a little right.


As You can see - image is a little darker now. Now we will draw some fire. Make New Layer, select soft brush of the size You will choise, and using dark orange colour (for example #993300) make a "dot". Next use a smaller size with lighter colour (like #ff9933) make another dot. Again, smaller size, lighter colour (for example #ffcc66), and last time, smaller size, lighter colour (#ffff66) and dot.


Now it's time for a little "magic". Use Smudge Tool (R). Pick small, soft size, and make "fire tongues". Just click somewhere inside our dot, click, hold and drag it up. After first move You will know what I'm meaning. Try untill You will be satisfied. Remember that You may change the Strenght parameter. You will use Alt + Ctrl + Z combination lot of times!


Now lets make this fire more realistic by adding some light on hands. Go to Quick Mask Mode (Q), select big, soft brush, and "draw" there, where You think that the light should appear.


Leave Quick Mask Mode (Q), You will see a sellection. We have to inverse it by Select -> Inverse (Shift + Ctrl + I). Select our Hands Layer, and holding the Alt key add another Adjustment Layer called Color Balance (Use Previous Layer... should be sellected)


Now select our Color Balance Adjustment Layer Mask, and using black soft brush "erase" some lights, and using white - add some lights until You will feel that it looks good.


Next thing will be smal sparks. We have to prepare brush for this operation.


With those settings draw some sparks over our fire (on New Layer). Lower the Opacity of this layer (in my case it is 64%). Use orange colour picked from our fireball (just improvise).


My final result:

Make Picture More Sharpening With High Pass

While debates continue over which of Photoshop's two main sharpening filters is better, "Unsharp Mask" or the new (as of CS2) "Smart Sharpen", one method of sharpening images remains not only highly effective but also much easier to use than either of those sharpening filters, and that's by using Photoshop's High Pass filter.

The reason the High Pass filter technique works so well at sharpening images is because any areas in the image which are not an edge are left untouched. The only areas that have sharpening applied to them are the edges, which is exactly what you want, and also what all of those confusing options in the "Unsharp Mask" and "Smart Sharpen" filters are trying to help you achieve.

With the High Pass filter, you can often get better results than either of the sharpening filters can give you without fumbling around with confusing options. In this Photoshop tutorial, we'll look at how to use it.

Here's the image I'll be using for this tutorial:


Here's how it will look after sharpening it with the High Pass filter:


Let's get started.

Step 1: Duplicate The Background Layer

The first thing we need to do is duplicate the Background layer, so I'll do that using the quick keyboard shortcut Ctrl+J (Win) / Command+J (Mac). I can see in my Layers palette now that I have my original Background layer at the bottom, which contains my original pixel information, and the duplicate of it, which Photoshop automatically names "Layer 1", above:


Step 2: Change The Blend Mode Of The Duplicate Layer To "Overlay"

Next, we need to change the blend mode of the duplicate layer from "Normal" to "Overlay". The reason is that the High Pass filter is going to turn all non-edge areas of the image into neutral gray, and the Overlay blend mode leaves all neutral gray areas alone, which means no sharpening will be applied to any of those areas. So to do that, go up to the Blend Mode options in the top left corner of the Layer Styles dialog box, click on the down-pointing arrow to the right of the word "Normal", and select Overlay from the list:


Your image will now appear to have way too much contrast, as we can see here with mine:


Don't worry, it's only temporary. We're changing the blend mode now so that we can see a preview of our sharpening being applied with the High Pass filter, which we'll do next.

Step 3: Apply The "High Pass" Filter To The Duplicate Layer

Now that we have the blend mode set to Overlay, which is going to allow us to see a preview of what we're doing, we can apply the High Pass filter. To do that, go up to the Filter menu at the top of the screen, choose Other down near the bottom, and then choose High Pass. This brings up the High Pass filter dialog box:


Photoshop's High Pass filter is very simple to use. It has a slider bar at the bottom to increase or decrease the intensity of the filter (the "Radius" value), as well as an input box if you'd prefer to type a value directly into it, and that's all there is to it except for the large preview area and the "Preview" checkbox in the top right corner. Definitely much simpler than "Unsharp Mask" or "Smart Sharpen".

To sharpen your image with the High Pass filter, keep an eye on your image in the document window and adjust the Radius value by dragging the slider bar left or right. As you drag towards the right, you'll be adding more sharpening, and as you drag to the left, you'll be reducing the amount of sharpening. You're going to want to start off with a very low radius value, somewhere between 2-5 pixels, and even that may be too much depending on the pixel dimensions of your image. I'm using a small version of the image for this tutorial, and I can already see that 2 pixels is too high. If you go too high, you'll begin to see a halo effect around the edges of your image, and you want to avoid that, so back off on the radius value by dragging the slider bar to the left once the halos begin to appear.

For my image, and again I'm using a small version of the photo for this tutorial, I'm going to set my Radius value to 1.2 pixels, which gives me a nice amount of sharpening around the edges in the image without sharpening any non-edge areas:


Here's my image after sharpening it with a radius value of 1.2 pixels:


If you're working on a larger image, which you probably area if the image came out of your digital camera, you'll most likely end up using a higher radius value, but again, don't go too far. Lower pixel values work best.

There's a couple of things we can do now to fine-tune the sharpening, which we'll look at next.

Step 4: Change The Blend Mode To "Soft Light" Or "Hard Light" If Needed To Adjust Sharpening

Now that we've applied our sharpening to the image, one of the ways we can fine-tune it is by changing the blend mode of our duplicate Background layer. Right now, we're using the "Overlay" blend mode, which is sort of the "average" amount of sharpening. If you want to increase the sharpening amount, go back up to the Blend Mode options in the top left corner of the Layers palette, click on the down-pointing arrow to the right of the word "Overlay" and change the blend mode to Hard Light:


If you want to reduce the amount of sharpening, change the blend mode from "Overlay" to Soft Light, again by clicking on the down-pointing arrow in the top left of the Layers palette and selecting "Soft Light" from the list:


For comparison, here's the same image using all three blend modes to adjust the sharpening. The image on the left is using Soft Light, the one in the middle is set to Overlay, and the one on the right is set to Hard Light:


The difference may not be easy to see on your monitor with these low resolution images, but if you're working on larger images, the difference between the three blend modes will be more apparent.

Step 5: Reduce The Sharpening Amount By Lowering The Layer Opacity

Another simple way to fine-tune the sharpening is by adjusting the duplicate layer's opacity value. Lowering the opacity value will reduce the amount of sharpening. You'll find the Opacity option in the top right corner of the Layers palette, directly beside the blend mode options. I'm going to set my blend mode to Hard Light and then lower the opacity of the layer to 80%:


Here, after lowering the opacity, is my final result:

Quick Photo Touch-up Technique : Painting with Light

Step One: Image to Touch-Up

Obviously we need to start with something. I'll be using the photo below.


Step Two: Set Color & Start Painting

More often than anything else, this technique will be used when you have a photograph of someone inside a house - there isn't a lot "wrong" with the photo I'm working with but we're going to play anyways.

The first step here is to set your foreground color. Think of natural lighting colors - a very light, almost-white yellow, oranges, etc. Make sure that any color you use is nearly white, but not quite.

Then, grab a brush - it doesn't really matter what one, as long as it's not too large. Create a new layer (Layer, New, New Layer) and start painting the areas that could use highlighting.


Step Three: Layer Mode

After you've painted a few key areas, it's time to see how it looks. Go to your layer mode drop-down (it's right at the top of your layers palette, and currently says "Normal") and choose "Overlay".

You may want to lower the opacity and/or clean up the painting with an eraser.

To add more highlights on other areas, repeat the process using a slightly different color on a new layer. This will start building up a beautiful series of highlight and shadow.