Tampilkan postingan dengan label Photo Manipulation. Tampilkan semua postingan

A Photo Inside a Photo

In this Photoshop tutorial, we are going to create a photo inside a photo in Photoshop. This effect will bring the main subject of your photo in the spotlight by creating the illusion of a smaller, cropped version of the photo within itself.
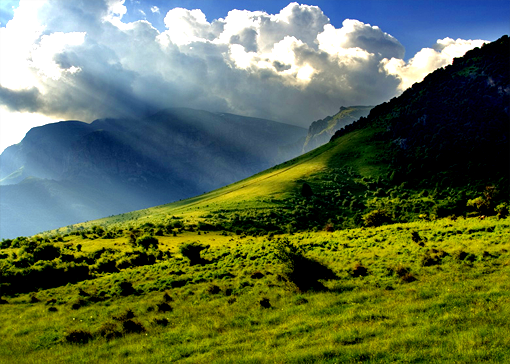
1. Open whatever image you would like to work on in Photoshop. This is the image we will be using for creating a photo inside a photo:
2. Duplicate the background layer.

3. Go to: Filter > Blur > Radial Blur and make the following changes:
4. Create a new layer. Name this layer as Photo.

5. Use the Rounded Rectangle Tool to draw in a rectangle.

6.  Right click on the shape and choose Fill Path.
7. Choose 50% Gray and click OK.
8. Double click the Photo layer to open Layer Style.
    Make the following changes:

9. Right click the Photo layer and choose Delete Path.
10. Duplicate the Background layer once again and place it over the Photo layer in the Layer Panel.
11. Right click on the layer thumbnail of this new background layer and choose Radial Blur.
12. Go back to the Photo layer.

13. Press CTRL+T to rotate the Photo layer.
14. Now create an Adjustment layer and choose Curves. Then make the following changes:
That’s it,

Final Picture:

AKVIS Sketch Quicktime Transition


In this tutorial, we are going to use AKVIS Sketch with Photoshop (CS4+) to easily create a QuickTime movie that starts out with a sketch and transitions to a full-color photo!
Materials needed:
  • Photoshop CS4+;
  • AKVIS Sketch (This tutorial assumes you have installed as a plug-in);
  • QuickTime plug-in;
  • A model photo.
Original
 
 Result
Step 1. Start with a model photo.
Step 2. With that layer active, press Ctrl + J (Windows) to quickly make a duplicate. Name the duplicate layer “Sketch.”
Step 3. With the “Sketch” layer still active, go to Filter -> AKVIS -> Sketch.
Call AKVIS Sketch plug-in
Step 4. You will now be taken to the AKVIS Sketch interface. Use the handy presets drop-down to select some nice pre-configured settings. Don’t be afraid to fine-tune the settings. I chose AKVIS Default.
AKVIS Sketch window
Step 5. Click the After tab. Aftera few moments of rendering, you will see how the image will look after the current settings are applied. If you are satisfied, click OK Sign, If not, continue to tweak the settings.
Processed image
Step 6. You will now be back in Photoshop, and the AKVIS Sketch filter will be applied to the “Sketch” layer.
Step 7. Let’s open up the Animation panel. Go to Window -> Animation.
Open up Animation panel
Step 8. If the Animation is in Timeline mode, open up the panel menu and choose Convert to Frame Animation. You will see one frame, and the thumbnail should reflect the active “Sketch” layer.
Panel menu
Step 9. You will see a time delay setting below the frame. Make sure that is set to 0.1 sec. Also, on the bottom left of the Animation panel, the Loop setting should be set to Once.
Frame settings
Step 10. Click Duplicate Selected Frame to make your second frame. Toggle off the visibility icon to the left of the “Sketch” layer in the Layers panel. The second frame in the Animations panel should now reflect the original photo layer.
Duplicate Selected Frame
Step 11. With the second frame still selected, click the Tween icon at the bottom of the Animation panel.
Tween icon
Step 12. A window will appear. Make sure to Tween With: Previous Frame. Set the Frames to Add: 10.
Tweening
Step 13. You will see that 10 frames will be added in between the two initial frames, for a total of 12 frames.
Step 14. Go to File -> Export -> Render Video.
Export
Step 15. Name your video, choose your save destination, leave the settings to default (unless you are an expert), and click Render.
Render video
Step 16. You will now have a QuickTime movie that shows your AKVIS Sketch blooming to full photographic beauty!
Final Result
 The author of this tutorial is Andre Villanueva.

CS5 HDR Tutorial

In this easy CS5 HDR tutorial I'm going to show you how to make one cool image effect with few easy Photoshop CS5 manipulations. HDR or HDRi stands for High Dynamic Range imaging which in the digital photography and computer graphics means a set of techniques allowing a greater dynamic range of luminance between the lightest and darkest areas of an image. For the CS5 HDR tutorial I'm going to use this photo of the beautiful Bulgarian nature.
1. The first thing we have to do is to duplicate the original layer by right clicking on the layer an choosing "Duplicate Layer". We can name our first layer "original" and our duplicated layer "black and white" or just "B&W".
2. Now we have to adjust our "B&W" layer. First we will change the layer's blending mode to "Overlay". Next we have to desaturate the layer. We can do this by going to Image > Adjustments > Desaturate.
Or we can use the keyboard shortcut combination Shift+Ctrl+U. Now we're going to invert the "B&W" layer: Image > Adjustments > Invert Or we can use the keyboard shortcut combination Ctrl+I. 3. It's time to add some Gaussian Blur to our "B&W" Layer. We'll do this by going to Filter > Blur > Gaussian Blur. Tweak the blur radius around 30 pixels. You can adjust this to fit your own taste. Anywhere between 20 and 50 pixels will create the "glow" around the edges. Now if you have followed right our CS5 HDR tutorial, you will have an image similar to this:
4. The next thing to do is to duplicate again the original layer and to drag it on top of all layers. We can name this layer "Linear".
We have to change the layer's blending mode to "Linear Light".
Now tweak the opacity of the "Linear" layer until you are satisfied with the final result. For my image I set it to 60%. At the end you have to get an image that looks something like this:

Bring Colors to a normal image

In this tutorial I will show you a non-destructive technique to add vivid colors to your scene, turning it into a spectacular image that can impress your audience easily

Before & After:
Here is the image we will work with

And what we are going to create:

Step 1: Before walking into the main step, we should enhance its brightness and contrast a bit by going to Image>Adjustments>Color Balance. We can find here three options: Shadows, Midtones and Highlights. Adjust each of them as following:


It now looks better:

Step 2: Our scene has three parts: sky, trees and yard. First we will deal with the sky, enhance it by adding blue to the clouds. Use the Pen tool and make a closed path on the sky area, no need to be too exact.

Right click on the sky and choose Make Selection

The path is now changed into a selection (with moving dots)
Step 3: Create a new layer and select the Gradient Tool, set the gradient color from #066caa to white and Reflected Gradient. You should use Reflected Gradient instead of Linear Gradient to enhance its contrast.

Step 4: Press Ctrl-D to deselect the selected area. Go to Filter>Blur>Gaussian Blur and use a radius of 25.2 pixels

Step 5: Now change the blending mode of this layer to Overlay. This mode keeps the color of your current layer and adding it to the below layer so we can see blue in our sky

Step 6: Repeat this technique (from step 2) with the yard but you should use orange gradient instead of blue gradient. If you feel a bit confused, follow the images below:
+ Make a closed path and turn it into a selection:

+ Add a suitable gradient:

+ Blur it and change the blending mode to Overlay:

Step 7: Repeat this technique one more time with the trees, you should use a small radius of Gaussian Blur


And here is the dreamy result we will acquire:

This technique produces a stunning photo effect without destroying the original background. It's based on Blur effect and Overlay mode. Remember you can easily adjust the colors and brightness in each layer by reducing its Opacity and Fill parameters.