Easy Make Color Photo Black and White Conversions In Photoshop

This Photoshop tutorial is so easy , we’ll look at an easy way to get fast yet high quality black and white conversions out of our color photos. Normally, for high quality black and white results.
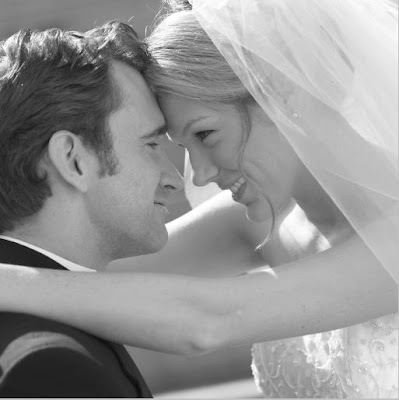
Final Image Result:


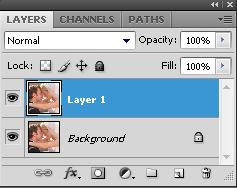
Step 1: Duplicate Background Layer
Shortcut Key.keyboard Press Ctrl+J


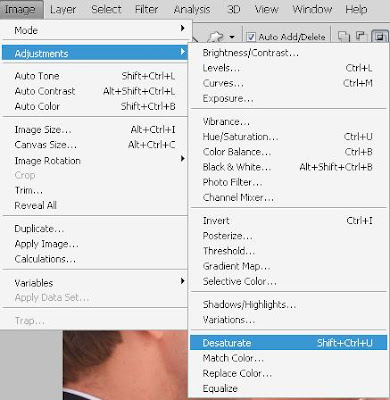
Step 2: Image > Adjustments > Desaturate.
keyboard shortcut, Shift+Ctrl+U.


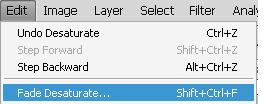
Step 3: Go Edit > Fade Desaturate
keyboard shortcut, Shift+Ctrl+F


Step 4: Change The Blend Mode To “Color”


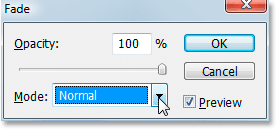
Opacity 100% Mode Color


Than Here We Result:


Bonus Step: Bring Back A Hint Of Color


And here’s the result
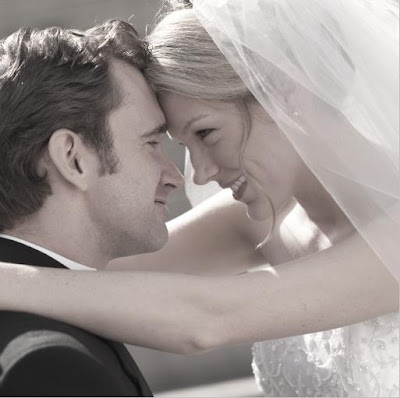
Half Sepia Photo Effect

This version of the half sepia photo effect has higher contrast and works better for more photos.

Step 1:
Open a photo inside Photoshop. The half sepia photo effect works on most photos but is most useful for images with high saturation.


Step 2:
In the Layers palette, click on the Adjustment Layer Icon and select Hue/Saturation

The Hue/Saturation tool will appear. First, checkmark the Colorize option near the bottom right corner. Copy the settings from the image below then click OK.

Your image should now have a bright sepia tone.


Step 3:
We will now work on the layer mask of the Hue/Saturation adjustment layer. Make sure that you have the layer mask selected by clicking on the layer mask thumbnail in the Layers palette.

Choose Image > Apply Image and use the default settings. The only setting that you may need to adjust is the Invert setting. If you leave the Invert option unchecked, the sepia tone effect will only be visible in the brighter areas of your image. If you enable the Invert option, the sepia tone will be visible only in the darker areas of the image.


Step 4:
Now we'll add a black and white adjustment layer.In the layers palette, click on the Adjustment Layer Icon and choose Black & White. If you are using Photoshop CS2 or older, you will not have the Black & White menu option. Instead, choose Channel Mixer.

The Black and White or Channel Mixer (If you're using Photoshop CS2 or older) settings will appear. Simply click OK with any settings. We'll go back to edit the settings later.

Change the blending mode of the new Black & White or Channel Mixer adjustment layer to Soft Light.

Double click on the Black & White or Channel Mixer adjustment layer thumbnail to bring back the settings. Adjust the settings while looking at the preview to get the results that you desire. If you are using the Channel Mixer tool, checkmark the monochrome option.


Half Sepia Final Results


Bring Colors to a normal image

In this tutorial I will show you a non-destructive technique to add vivid colors to your scene, turning it into a spectacular image that can impress your audience easily

Before & After:
Here is the image we will work with

And what we are going to create:

Step 1: Before walking into the main step, we should enhance its brightness and contrast a bit by going to Image>Adjustments>Color Balance. We can find here three options: Shadows, Midtones and Highlights. Adjust each of them as following:


It now looks better:

Step 2: Our scene has three parts: sky, trees and yard. First we will deal with the sky, enhance it by adding blue to the clouds. Use the Pen tool and make a closed path on the sky area, no need to be too exact.

Right click on the sky and choose Make Selection

The path is now changed into a selection (with moving dots)
Step 3: Create a new layer and select the Gradient Tool, set the gradient color from #066caa to white and Reflected Gradient. You should use Reflected Gradient instead of Linear Gradient to enhance its contrast.

Step 4: Press Ctrl-D to deselect the selected area. Go to Filter>Blur>Gaussian Blur and use a radius of 25.2 pixels

Step 5: Now change the blending mode of this layer to Overlay. This mode keeps the color of your current layer and adding it to the below layer so we can see blue in our sky

Step 6: Repeat this technique (from step 2) with the yard but you should use orange gradient instead of blue gradient. If you feel a bit confused, follow the images below:
+ Make a closed path and turn it into a selection:

+ Add a suitable gradient:

+ Blur it and change the blending mode to Overlay:

Step 7: Repeat this technique one more time with the trees, you should use a small radius of Gaussian Blur


And here is the dreamy result we will acquire:

This technique produces a stunning photo effect without destroying the original background. It's based on Blur effect and Overlay mode. Remember you can easily adjust the colors and brightness in each layer by reducing its Opacity and Fill parameters.

Adobe Photoshop 12.0.1 CS 5 Ext Portable

Adobe Photoshop 12.0.1 CS5 Ext Portable | 87MB


The professional image-editing standard and leader of the Photoshop digital imaging line. Adobe Photoshop software, the professional image-editing standard and leader of the Photoshop digital imaging line, delivers more of what you crave. Groundbreaking creative tools help you achieve extraordinary results. Unprecedented adaptability will let you custom-fit Photoshop exactly to the way you work. And with more efficient editing, processing, and file handling, there's no slowing you down.


Create with unmatched power

Timesaving file handling with Adobe Bridge (formerly the File Browser)

Multitasking
Take advantage of compact floating mode in Adobe Bridge to process images while simultaneously working in Photoshop.
Viewing options
Easily browse your Adobe Creative Suite and other graphics files in Adobe Bridge; present your images with features like Slideshow and Filmstrip mode; scale thumbnails to any size using a slider; and view and edit metadata.

Automated batch processing
Automatically process batches of images in Adobe Bridge to rename, convert format, adjust exposure, create a web gallery or Adobe PDF Presentation, and more.

Rating and labeling
Quickly rate and label photos in Adobe Bridge so you can instantly bring up your best shots.

Sophisticated search
Easily find any image using sophisticated search capabilities in Adobe Bridge that let you specify a variety of parameters. Save searches as Collections that you can recall anytime.

Professional color and tone control

Match Color command
Achieve a consistent look between package shots, fashion photos, and more by instantly matching the color scheme of one image to another.


Download

Code:
http://rapidshare.com/files/405240615/devilsfunhouse.orgA_d_Phot_12.0.1_Portable.rar
or
http://hotfile.com/dl/52858552/91881d3/devilsfunhouse.orgA_d_Phot_12.0.1_Portable.rar.html

Realistic View Tears on Face

In this Photoshop tutorial I would like to invite your attention to the unique technique how to make realistic view tears effect.
So, in the beginning you should find a good picture to work with. You can try to find it on stock photo web sites or also can use this. Open up the picture. Then select the Pen Tool and try to make good form of the tear with black color.


Pay your attention that the form must be how much more uneven to be similar to a real tear. When we are done with form, then change layer mode to Screen for the current layer and apply following Blending Options:
1. Drop Shadow
2. Inner Shadow
3. Inner Glow
4. Bevel & Emboss
5. Gradient Overlay


The result should be next:


Looks good, but not so realistic for now. I would like to bring some white glare to this form. Select the Pencil Tool and brush about 1 pixel, then make a few dots with white color on the new layer like on my picture below.


After that apply Blur Tool to current layer.


We got a nice realistic view result isn’t it? Don’t be afraid to experiment and you will get your own cool effects!