Which File Type is Best for Your Graphics?
Every time a graphic file is saved on the computer, the program saves the artwork with a specific file format. Some formats are high resolution, some are low; some are specific to the native application (like .doc files are MS Word), while others can be used by different computers and different applications.
Just as different software programs are good at performing different tasks, different file formats are good for different purposes. You wouldn't use MS Word to construct a large table of financial data; you'd use MS Excel. The same principle goes for file formats, some are suited for lower-resolution web graphics and email, and others are high-resolution graphics for printing.
Who cares? You should…
This can be down right confusing for a non-expert. In fact, it can be disastrous to spend hours working on a file and have it in the wrong format. Artwork in the wrong file format might be:
All of these will result in costing your more time and money. The good news is: experienced business designers will know from experience exactly which file type to use for each specific circumstance.
For those looking for a little extra knowledge, or gluttons for punishment, here is a quick synopsis of when to use which file type:
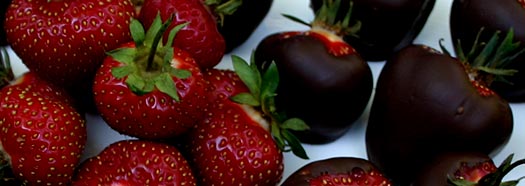
.jpg - "jay peg", great for web sites and email, this file format compresses continuous-tone images (like a picture with millions of colors) down to a size that can be downloaded of the Internet quickly. The downside to this format is that compressing the image too much will cause it to visibly degrade and look jagged.
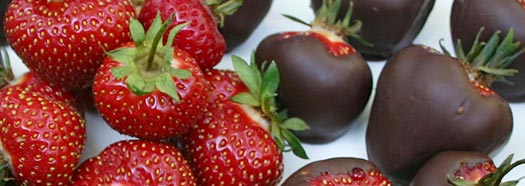
.gif - "gifs", pronounced with a "G", not a "J", also a terrific file type for the Internet and emailing. Gifs do an incredible job of compressing images and making them suitable for fast downloads. In contrast to the .jpg, the .gif is not suited for non-continuous color images, but solid colored images (some cartoons or clip art is a good example of this). One added bonus is that the .gif images can be placed on a web page with an clear background, so you layer them on a web page. Sometimes the artwork has a sharp, unattractive border when the image's background invisible, when this happens, go with the next file type, the .png.
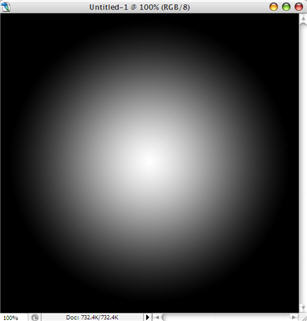
.png - "pings" or "p.n.g's:, this format can act as a hybrid between the .jpg and the .gif, it allows users to compress either non/continuous-tone color images, and allow you to put the on a web page with a clear background. .Pngs are usually larger in file size than the previous file formats but they allow people to save artwork to be layered on web pages or other artwork without any sharp or disruptive border. .Pngs are extremely versatile, but they usually result in larger files and longer download times.
.eps - "encapsulated postScript", these files can be vector or raster - which makes them extremely powerful, this goes beyond the scope of this article. Professional printers and printable advertising media, like a magazine, will typically ask that the artwork be saved as an .eps file or perhaps a .tif. Recently the .pdf document has made some headway into certain areas of printed media as well.
.tif - "tagged image file format", a versatile color space file format (CMYK, RGB, Grayscale) and cross-platform between Mac and PC. The .tif file format was originally intended for scanning, and a lot of scanned images are saved as tifs. Printers and advertisers will often request or permit final artwork to be designed in a tif.
.pdf - "portable document format", Adobe's native file format that is read by a program called Adobe Acrobat. Most computer users have Acrobat on their system, if they don't they can download Acrobat Reader for free. The .pdf has a wide range of uses, including a lot of usage on web, interactive forms and they can even be used for printing.
Top 5 Indications You've Used the Wrong File Format
The printer you are using starts to laugh at you
The printer you are using starts to cry in front of you
Colleagues complain that you are filling up her/his mailbox with large image files
Prospects visiting your web site indicate your company logo looked out of focus and more like a blob of mustard and relish
You've decided on which file format to use based on a novel magic 8 ball
Just as different software programs are good at performing different tasks, different file formats are good for different purposes. You wouldn't use MS Word to construct a large table of financial data; you'd use MS Excel. The same principle goes for file formats, some are suited for lower-resolution web graphics and email, and others are high-resolution graphics for printing.
Who cares? You should…
This can be down right confusing for a non-expert. In fact, it can be disastrous to spend hours working on a file and have it in the wrong format. Artwork in the wrong file format might be:
- Rejected by a printer
- Incompatible with a computer
- Result in slower download times
- Reproduce over the Internet or on print with unpredictable or awful results.
All of these will result in costing your more time and money. The good news is: experienced business designers will know from experience exactly which file type to use for each specific circumstance.
For those looking for a little extra knowledge, or gluttons for punishment, here is a quick synopsis of when to use which file type:
.jpg - "jay peg", great for web sites and email, this file format compresses continuous-tone images (like a picture with millions of colors) down to a size that can be downloaded of the Internet quickly. The downside to this format is that compressing the image too much will cause it to visibly degrade and look jagged.
.gif - "gifs", pronounced with a "G", not a "J", also a terrific file type for the Internet and emailing. Gifs do an incredible job of compressing images and making them suitable for fast downloads. In contrast to the .jpg, the .gif is not suited for non-continuous color images, but solid colored images (some cartoons or clip art is a good example of this). One added bonus is that the .gif images can be placed on a web page with an clear background, so you layer them on a web page. Sometimes the artwork has a sharp, unattractive border when the image's background invisible, when this happens, go with the next file type, the .png.
.png - "pings" or "p.n.g's:, this format can act as a hybrid between the .jpg and the .gif, it allows users to compress either non/continuous-tone color images, and allow you to put the on a web page with a clear background. .Pngs are usually larger in file size than the previous file formats but they allow people to save artwork to be layered on web pages or other artwork without any sharp or disruptive border. .Pngs are extremely versatile, but they usually result in larger files and longer download times.
.eps - "encapsulated postScript", these files can be vector or raster - which makes them extremely powerful, this goes beyond the scope of this article. Professional printers and printable advertising media, like a magazine, will typically ask that the artwork be saved as an .eps file or perhaps a .tif. Recently the .pdf document has made some headway into certain areas of printed media as well.
.tif - "tagged image file format", a versatile color space file format (CMYK, RGB, Grayscale) and cross-platform between Mac and PC. The .tif file format was originally intended for scanning, and a lot of scanned images are saved as tifs. Printers and advertisers will often request or permit final artwork to be designed in a tif.
.pdf - "portable document format", Adobe's native file format that is read by a program called Adobe Acrobat. Most computer users have Acrobat on their system, if they don't they can download Acrobat Reader for free. The .pdf has a wide range of uses, including a lot of usage on web, interactive forms and they can even be used for printing.
Top 5 Indications You've Used the Wrong File Format
The printer you are using starts to laugh at you
The printer you are using starts to cry in front of you
Colleagues complain that you are filling up her/his mailbox with large image files
Prospects visiting your web site indicate your company logo looked out of focus and more like a blob of mustard and relish
You've decided on which file format to use based on a novel magic 8 ball