Fashion Retouching: Advanced Soft Focus

In this tutorial I will showyou an old technique done in the digital age with much more precision and control. We will look at two techniques used in fasion retouching for a face and you will see on my example how each one looks. So let's get started!


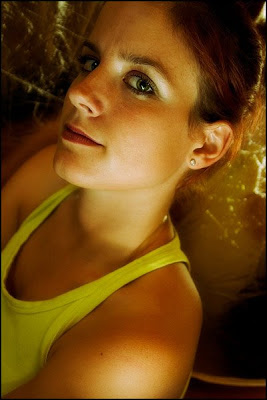
I'm going to use an image I shot recently of Stasha. In case you are interested - this was shot with two flashes bounced off nearby walls and a soft gold reflector which you can see in the background. It was done for a group photography exhibition which opened recently in Slovenia.


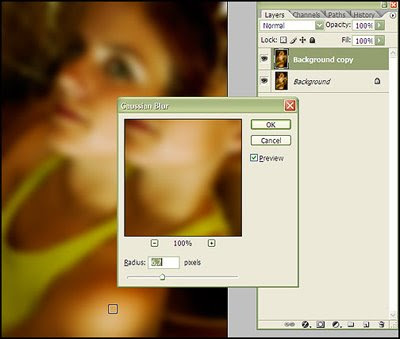
Duplicate the existing layer (Ctrl+J) and go to filter/blur/gaussian blur. Don't copy the settings I have but try to mimic the relative effect (amount of blur) I got. Since the radius number relies on how big the image is you can't really use it as a always-works setting. Hit OK.


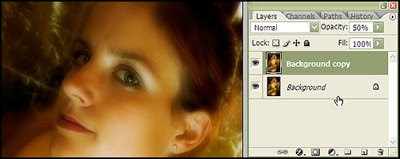
The next step is to set the opacity value to 50%. You can go lower (I usually go as low as 20%) but to make the effect apparent I am going to use this value. Leave the blending mode to normal at this point or try soft light.


Soft focusing makes the eyes lack detail and this might be a problem for a lot of photographers using film. With digital we can get over this problem by selectively masking out areas we want to attract more attention. In my case this was the lips and both eyes. I created a show-all layer mask and with a big soft brush clicked on the parts where I wanted focus to have a bit less effect.


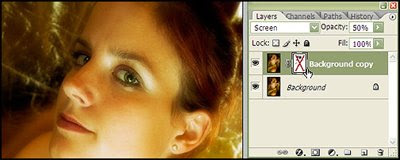
This image has the same blur layer but this time the blending mode is set to screen and the layer mask is turned off (if it wasn't it would create a skull-like effect with dark outlines around the eyes). Personally I like this effect the most so I'm keeping it.


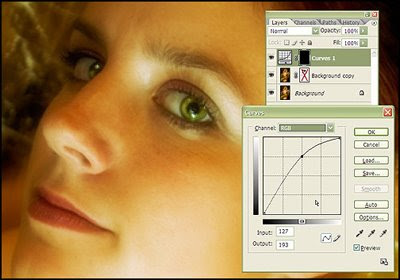
To add some extra spark to the image I have added a curves adjustment layer to brighten up her eyes a bit. And that's it, this concludes the fashion retouching tutorial, I hope you had a nice time. If you have any comments about it I would like to hear them either here as comments. Have a nice one!

Do you Know About RSS Feed?


Author: Subhash Kumar


RSS is a format for syndicating content and metadata over the Internet. It is commonly used to share headlines and links to news articles. With news articles, the actual article isn't usually shared, but metadata about the article is; this metadata can include a headline, a URL, or a summary. RSS is an important tool for publishers because feeds can be used to syndicate content, and to integrate third-party content into your site.

Article about RSS Feeds; RSS is a form of eXtensible Markup Language or XML. Viewing an RSS feed in a web browser generally produces code that is not easy for website visitors to decipher. As a result, webmasters use tools to display the content contained in an RSS feed.

Benefit to the Webmaster:

As the web has become more crowded webmasters have been striving to provide fresh and up to date content for their website visitors. Many webmasters have discovered they can easily utilize the information in RSS feeds to provide fresh web content.

RSS Allows Webmasters:

  • Provide fresh and relevant content on their website, which encourages users to return.


  • Constantly changing content means that search engine spiders will visit more frequently.


  • Automate content delivery.


Benefit to Web Surfers:

The beauty of RSS is that readers can quickly scan headlines (titles) and read articles of interest. Because the information is condensed and provided in a single location users can generally review more information in a shorter time frame. Additional information is only a click away. Best of all readers choose the feeds they wish to see, there is no spam with RSS. If you are not completely thrilled with the content appearing in a feed simply remove it from the newsreader.

RSS Allows for Users:

  • Easily locate information.


  • Read condensced information or 'soundbytes' with clearly marked and dated topic material.


  • Classify and categorize information in an easy to navigate manner.


  • Maximize their time without having to deal with spam.

RSS feeds can be viewed in a news aggregator or reader, which constantly updates and shows unread feeds. I found the functionality of the newsreaders to be similar to a simple email client. Consumers generally enter the URL of any RSS feeds that interest them.

RSS Allows for Content Developer:

  • Increase exposure in niche markets.

  • Communicate with user bases and reach potential customers via an alternate communication method.


  • Disseminate relevant information.


  • Define themselves as an industry expert.


  • Automate content delivery.

RSS has effectively standardized the format for content delivery and has effectively defined the accepted standard for content distribution and syndication. RSS will likely rival email as a means of content distribution in another few years. The shear simplicity makes the technology very appealing.

How RSS is used:

  • A publisher has some content that they want to publicize.


  • They create an RSS channel for their content.


  • In this channel, they include items for Web pages they want to promote.


  • This channel can be read by remote applications, and converted to headlines and links. These links can be incorporated into new Web pages, or read in dedicated readers.


  • People see the links on various sites, click on them, and go to the original publisher's site.

While headline syndication is the most common use for RSS, it is also used for many other purposes. RSS is a very popular format in the weblog community. It's also used for photo diaries, classified ad listings, recipes, reviews, and for tracking the status of software packages.

Benefit of Using RSS:

RSS is an easy way for you to be alerted when content that interests you appears on your favorite Web sites. Instead of visiting a particular Web site to browse for new articles and features, RSS automatically tells you when something new is posted online. Click on the section title link to obtain the RSS URL, which you will see in the "Address" field of your browser. Simply copy this URL and follow the instructions for your particular news reader to subscribe.

Magnifying Glass

1. In this tutorial I'll explain how you can create an image zoom effect using the magnifying glass. First of all you'll need a screenshot of something you want to magnify, in my case I searched for the word magnify on wikipedia and took a screenshot of it. Then I openened photoshop (edit - paste) on a new document (800*600).


2. Now you'll need a picture of a magnifying glass, below this second step you can download one or drag it on your document, it should already be transparent. Everything should look like the second picture for now…


3. Now select the inside area of the magnifying glass using your magic wand tool, that will become the part of the screenshot that we will magnify.


4. Now go to (edit - cut) and make sure you've selected the layer with your screenshot. After that just go to (edit - paste) to paste the selection which will be magnified! Everything should look like the previous step but now the magnified part will be on another layer.


5. After that it's time to shrink our screenshot layer. So select it and go to (edit - transform - scale). In the screenshot below you can see that I changed it with 25% to 75% instead of 100%. Please make sure you move the layer with the screenshot so that you can't see the part where we cut out the magnified piece.


6. This time we'll add a gaussian blur to the layer with the screenshot. Select it and go to (filter - blur - gaussian blur) with a radius of about 2px.


7. In this step we'll add some depth to our magnifying glass, so go ahead and select the right layer and add a drop shadow (layer - layer style - drop shadow). The settings I've used are shown in the image below.


8. Now select the layer you've cut out in step 4 and add an inner shadow (layer - layer style - inner shadow) with the following settings.


9. That's it, you've just created an image zoom effect using a magnifying glass! Here is my final result! You can download the .psd file if you have a problem or contact me!