Tutorial Photoshop - Teks Efek Hulk


Buat sebuah dokumen baru dengan ukuran 800 x 400 px lalu beri warna dasar hitam
Selanjutnya buat sebuah layer baru (Shift + Ctrl + N) lalu dengan menggunakan
 Eliptical Marquee Tool buat sebuah oval memanjangan 
lalu dengan menggunakan Gradient Tool isi oval tersebut dengan warna #00e42b

jika sudah tekan tombol CTRL + D pada keyboard untuk menghilangkan seleksi ovalnya
selanjutnya buka menu Filter > Blur > Gaussian Blur maka akan muncul jendela baru nah setting radius nya menjadi 70 px lalu tekan ok. Maka hasil sementara gambar kira-kira seperti gambar dibawah ini
selanjutnya simpan gambar retakan dibawah ini lalu masukkan ke lembar kerja kita tadi , lalu tekan CTRL + T atur ukuran gambar sehingga menutupi seluruh lembar area kerja seperti gambar dibawah ini


selanjutnya ubah blending mode nya menjadi overlay


selesai deh tahap pembuatan background. sekaran kita mulai pembuatan text nya
selanjutnya dengan menggunakan Horizontal Type Tool buat sebuah text, 
disini saya membuat sebuah text "HULK" dengan font style Haettenschweiler atau kamu bisa mengguanakan Arial Black yang penting jenis text nya agak2 gemuk gitu


selanjutnya buka menu Layer > Layer Style > Drop Shadow maka akan muncul jendela baru 
nah setting beberapa pilihan di window tersebut seperti gambar dibawah ini


nah..maka gambar kita akan terlihat seperti gambar dibawah ini

load (masukkan ke lembar kerja kita) lagi gambar tanah kering tadi atur posisinya dengan Free Transform (CTRL + T) atur posisi dan ukurannya sehingga menutupi seluruh text nya seperti gambar dibawah ini


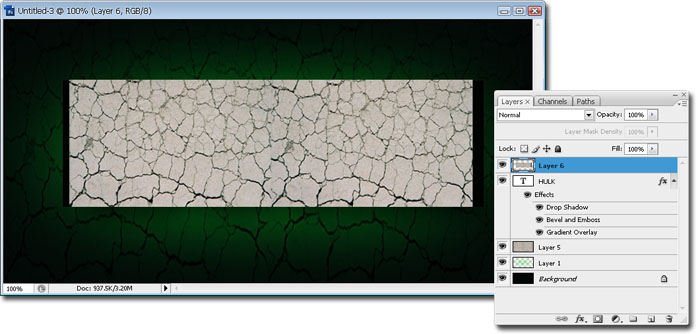
Selanjutnya CTRL + Klik Kiri layer text nya maka akan terbentuk seleksi sesusai text nya, 
lalu tekan Shift + Ctrl + i maka pola seleksi berubah, jika sudah tekan tombol DEL maka gambar tanah kering mengikuti pola text nya, seperti gambar dibawah ini


nah sekarang ubah layer gambar tanah kering tadi menjadi vivid light


maka hasilnya menjadi seperti gambar dibawah ini


Tutorial Photoshop

Beberapa Tutorial Simpel dalam Editing Foto


Untuk menghasilkan efek gambar seperti diatas anda cukup memanfaatkan fitur  
Hue/Saturation, berikut settinganya


Coba gunakan nilai/warna lain untu Hue seperti hijau, biru maupun merah

Bleach Contrast


Berikut settinganya


Retro Film


Settinganya buka menu Layer - Layer Style - Color Overlay, lalu atur propertis nya seperti gambar berikut


Membuat Efek Bersinar Pada Foto


helou..jumpa lagi , jumpa ane disini, ya disini (cilukba...) kasi tutorial lagi ada yg tau ga lagu sapa ini

Kali ini saya kembali akan memberikan tutorial singkat dan sederhana namun efeknya sangat makbrurrr seperti yang bisa dilihat pada hasil akhir diatas

cara pembuatannya sangat mudah, pertama-tama buka gambar/foto yang akan diedit lalu 
gandakan layer fotonya dengan menekan CTRL + J


Lalu buka menu Filter - Blur - Gaussian Blur atur propertis nya seperti gambar dibawah ini


Setelah itu ubah mode layernya menjadi Screen.
Jika hasilnya terlalu cerah kamu cukup mengurangi nilai Opacity nya saja


Berikut hasil akhir dari  Tutorial Photoshop kali ini, mudah bukan


Ways to become skinny in 3 minutes

How to become skinny in 3 minutes: This is an Old Photoshop work to show the power of this program. This video would show only one of thousand possibility that Photoshop offer to us. After using Photoshop for long time you will have anyway something to learn.

Choose An Entry Level DSLR


People who own a point and shoot camera eventually want to move to having a DSLR. Other reasons could be you want clearer images, you want more control over your camera or you want to become a professional photographer.
Whatever your reason, you can start with having an entry level DSLR. This is lighter than the real DSLR and is more affordable as well.
So first things first. Consider the brand and you have many to choose from - Canon, Fujifilm, Kodak, Nikon, Pentax, Panasonic, Olympus and Sony. Most share the same features but if you often travel and take photos during special occasions, you need to pick a model that's easy to operate but at the same time one that can ensure image quality.
  • The brand
For those who are serious in getting into photography, the two famous brand names you should consider are Nikon and Canon. Most, if not all, professional photographers use these brands.
  • The sensor
As for the digital camera components, the camera sensor is an important consideration if quality images are your priority. Basically, there are two types of sensors - the CCD and the CMOS. The CMOS is present in the latest cameras today owing to its lower production cost while the older models utilized the CCD which provides better quality photos.
  • The body
Consider as well the camera body. This is essential particularly if you have plans of purchasing high-end accessories in the future and because you will need to get accessories such as the lens that match the body.
Most entry level DSLR cameras today have quality plastic bodies. Weather sealing, however, is what gives the higher type or the professional DSLR the edge. Hopefully, this will be made available for the entry level models in the future.
  • The material
When it comes to material, you have a choice between getting a metal and a plastic body. There's no doubt that the metal body is more durable and allows for better heat conduction notably while shooting videos. Nikon and Canon manufactures both metal and plastic bodied digital cameras.
  • The resolution
Some people often prefer cameras that have bigger megapixels thinking that it will give them better quality images. But this is a misconception.
Do understand that you need a higher megapixel camera only if you would like to print large photos. This is because printing a large size image requires more megapixels to produce clearer and crisper photos. A higher resolution is also ideal if you do extensive post processing of your images such as cropping without affecting the quality.
But if you just want to snap and store photos on your computer and share them online, then a 3.5 to 5 megapixel camera will do.
  • The price
The camera's affordability should be an important consideration. Know that you will not only be spending for the camera body alone but for other necessary accessories as well so make sure that you get only what you can afford. Calculating your expenses will help you choose the right entry DSLR camera that fits your lifestyle.

Web Designer and Web Designer Premium

Xara Web Designer is unlike any web design software you will have seen before; an easy template based solution that gives you total page design freedom, no HTML skills required. It comes in 2 versions, Web Designer and Web Designer Premium; Premium offers advanced web and graphic design features - find out more below
  • There's no easier solution
The Web Designer approach is simple: You can either create your own page and site designs from scratch with the powerful page layout and design tools or simply:
1) pick your design from the templates
2) customize it with complete freedom
3) publish.
Absolutely no HTML or Javascript skills are required!
Templates include individual web graphics, complete pages and even pre-built multi-page sites.
  • A one tool solution
ou only need one program for creating graphical websites - from design to publishing - and that's Web Designer or Web Designer Premium.

Web Designer includes customizable web graphic, webpage and website template designs plus tools for creating your own designs, for photo editing (an integrated ultra-fast, non-destructive photo tool), and for advanced text layout. The Designs Gallery also includes a collection of Widgets. Site upload is covered too and there's even a free web hosting offer!


  • Flash & GIF animation
Web Designer Premium is one of the easiest tools for creating truly efficient Flash animations, which you can export as .swf or add to any page being created in Web Designer.
  •  Extra Widgets
Web Designer Premium includes a larger selection of Widgets in the Designs Gallery, including the new, resizeable photo and content slideshow Widgets that can help give your website an edge, making them more interesting and dynamic. Plus there's a selection of interactive chart and graph widgets.
Premium also includes a choice of e-commerce Widgets and a neat 'embed a website' Widget - perfect for embedding blogs, microsites and other sites within your page.
  •  Website and remote presentations
With Web Designer Premium you can easily create web-based 'slide-show' style presentations, that your website visitors can step through using the keyboard arrow keys. Plus you can apply animated transition effects as each step and page is displayed.
You can also easily remotely host a web meeting (a 'Webinar') to showcase your presentation, step by step and page by page, to a group of invited participants.
  •  Animated page and layer transition effects
Web Designer Premium makes it easy to add a wide range of animated effects to the layers and page links in your website. You can add animated transitions to any page link or pop-up layer in your web pages.

  • Advanced graphics tools
Web Designer includes many customizable graphic templates of course, and a good set of basic drawing tools, but Premium includes a range of additional graphic creation tools for those who wish to create their own graphics from scratch. These include freehand and quickshape drawing tools, bevel, mould and 3D extrude. Plus additional photo features such as content aware scaling and zooming, and masking, and the Live Effects tool which provides support for Photoshop plugins.
  • Download
You can download or buy this product from xara website.