Sin City Style Photoshop Tutorial


Beautifull Sin City Art photoshop effect video tutorial .
Sin City Style Photoshop Tutorial - The best free videos are right here

How to Smooth Skin Without Losing Texture in Photoshop

There are several ways to smooth skin in Photoshop. All to often, however, skin can appear too smooth, fake, and synthetic. Today I will demonstrate a straightforward technique to help you smooth skin fairly quickly while preserving the texture of the pores. Let’s get started!

Final Image Preview

Take a look at the final image that we will be creating.

Original Image

Before we begin, let’s take a look at the original image.

Step 1

First, open your image and duplicate your background layer. Simply drag the layer onto the new layer icon in the bottom right of the layer palette. Now set the blending mode of this newly created layer to "Vivid Light."

Step 2

Now, let’s invert this layer. Do this by pressing Cmd + I or Image > Adjustments > Invert. Then, apply a Gaussian Blur by selecting Filter > Blur > Gaussian Blur. Applying a blur filter to an inverted picture will make it look shaper. Use the slider until you can see the pores on her face.

Step 3

Now let smooth the skin! Go to Filter > Other >High Pass. Move the slider until you are happy with the smoothing. You may notice some ghosting and other weird stuff around the eyes – just ignore it for now. Concentrate on the cheeks, forehead and nose.

Step 4

Almost done! Create a new mask for the layer and fill it with black to hide the image. Switch your color to white, select the mask and start drawing on the skin with a soft brush. Start at the cheeks, move over to the forehead, the nose and stop on the chin. If the effect is too strong for your liking, just lover the opacity of the brush and you’re good to go!

Final Image

We’re finished! I hope that you learned a few new techniques here. If you have a different approach, let me know in the comments!

AKVIS Sketch Quicktime Transition


In this tutorial, we are going to use AKVIS Sketch with Photoshop (CS4+) to easily create a QuickTime movie that starts out with a sketch and transitions to a full-color photo!
Materials needed:
  • Photoshop CS4+;
  • AKVIS Sketch (This tutorial assumes you have installed as a plug-in);
  • QuickTime plug-in;
  • A model photo.
Original
 
 Result
Step 1. Start with a model photo.
Step 2. With that layer active, press Ctrl + J (Windows) to quickly make a duplicate. Name the duplicate layer “Sketch.”
Step 3. With the “Sketch” layer still active, go to Filter -> AKVIS -> Sketch.
Call AKVIS Sketch plug-in
Step 4. You will now be taken to the AKVIS Sketch interface. Use the handy presets drop-down to select some nice pre-configured settings. Don’t be afraid to fine-tune the settings. I chose AKVIS Default.
AKVIS Sketch window
Step 5. Click the After tab. Aftera few moments of rendering, you will see how the image will look after the current settings are applied. If you are satisfied, click OK Sign, If not, continue to tweak the settings.
Processed image
Step 6. You will now be back in Photoshop, and the AKVIS Sketch filter will be applied to the “Sketch” layer.
Step 7. Let’s open up the Animation panel. Go to Window -> Animation.
Open up Animation panel
Step 8. If the Animation is in Timeline mode, open up the panel menu and choose Convert to Frame Animation. You will see one frame, and the thumbnail should reflect the active “Sketch” layer.
Panel menu
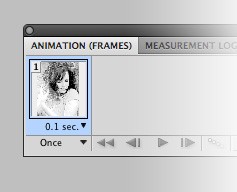
Step 9. You will see a time delay setting below the frame. Make sure that is set to 0.1 sec. Also, on the bottom left of the Animation panel, the Loop setting should be set to Once.
Frame settings
Step 10. Click Duplicate Selected Frame to make your second frame. Toggle off the visibility icon to the left of the “Sketch” layer in the Layers panel. The second frame in the Animations panel should now reflect the original photo layer.
Duplicate Selected Frame
Step 11. With the second frame still selected, click the Tween icon at the bottom of the Animation panel.
Tween icon
Step 12. A window will appear. Make sure to Tween With: Previous Frame. Set the Frames to Add: 10.
Tweening
Step 13. You will see that 10 frames will be added in between the two initial frames, for a total of 12 frames.
Step 14. Go to File -> Export -> Render Video.
Export
Step 15. Name your video, choose your save destination, leave the settings to default (unless you are an expert), and click Render.
Render video
Step 16. You will now have a QuickTime movie that shows your AKVIS Sketch blooming to full photographic beauty!
Final Result
 The author of this tutorial is Andre Villanueva.

Manipulasi Foto Dalam Bola

Tutorial Photoshop pilihan lainnya hanya untuk anda : Membuat Foto Terpisah-Pisah
Pertama-tama buat sebuah dokumen baru dengan ukuran 640 x 500 px. Lalu dengan menggunakan Gradient Tool (G) warnai background menjadi seperti gambar dibawah ini
Buat sebuah layer baru (shift + ctrl + n) dengan menggunakan Eliptical Marquee Tool buat sebuah lingkaran, agar lingkarannya sempurna tahan tombol shift lalu drag mouse maka akan tercipta sebuah seleksi lingkaran lalu dengan menggunakan Paint Bucket Tool (G) warnai lingkaran tadi dengan warna terserah kamu.
Buka menu Layer - Layer Style - Inner Shadow; Color Overlay. Lalu atur properti yang ada seperti gambar dibawah ini
Klik ok maka lingkaran tersebuat akan terlihat seperti pada gambar dibawah ini
Lanjut lagi buat sebuah layer baru lalu letakkan/drag layer tersebut dibawah layer bola. buat sebuah lingkaran oval horizontal dengan menggunakan Eliptical Marquee Tool, lalu dengan menggunakan Paint Bucket Tool warnai lingkaran tersebut dengan warna hitam, seperti pada gambar dibawah ini
Hilangkan seleksi dengan menekan ctrl + d pada keyboard, lalu buka menu Filter - Blur - Gaussian Blur lalu pada kotak Radius isikan dengan nilai 15 lalu klik ok tekan ctrl + F pada keyboard agar efek blur nya semakin kuat, lalu ubah opacity nya menjadi 40%
Selanjutnya buka gambar yang akan kamu masukkan kedalam bola disini saya menggunakan gambar seorang bayi, drag gambarnya kedalam bola lalu atur ukuran posisi dengan menggunakan free transform (ctrl + T)gambar yang saya gunakan sudah terlebih dahulu saya bersihkan backgroundnya, jika gambar yg akan kamu letakkan didalam bola mempunyai background yg mencolok solusinya kamu bisa menghapus terlebih dahulu background gambar kamu atau membentuknya menjadi bentukan bulat atau kotak (nanti akan ditunjukkan pada bagian akhir tutorial)
Lanjut lagi, kita akan menambahkan efek kilauan. Tahan tombol ctrl lalu klik layer bola maka akan menghasilkan sebuah seleksi bola. buat layer baru lalu dengan menggunakan Paint Bucket Tool warnai lingkaran tersebut dengan warna putih lalu ubah opacity nya menjadi 25%
Buat lagi sebuah lingkaran oval seperti gambar dibawah ini lalu tekan tombol del padal keyboard
Tekan ctrl + D untuk menghilangkan seleksi. Terakhir tinggal menambahkan teks (terserah kamu maunya pakai jenis font apa dan ukuran apa). Lalu beri layer style, Buka menu Layer - Layer Style - Drop Shadow; Color Overlay; Stroke
Maka hasil akhirnya
nah jika gambar yang ingin kamu input mempunyai background gambar kamu bisa memberi sedikit sentuhanpertama-tama beri dulu style stroke dan drop shadow pada gambar kamu seperti gambar dibawah ini
jika pemberian layer style selesai. buka menu edit - transform - pilih distort atau perspective tarik salah satu sudut titik nya sehingga gambar di transform, contoh dari yg saya hasilkan bisa dilihat pada gambar dibawah ini

How to Make a Timeless WEDDING Photo from a snapshot

Photoshop CS6 tutorial showing how to quickly transform any ordinary snapshot into a golden-hued, timeless image that will last forever. These techniques work especially well for wedding photos.

Karya Photoshop Pro ( 2)

jika biasanya saya membuat Tutorial Photoshop , nah kali ini saya hanya akan membagikan hasil jadi dari para jagoan-jagoan photoshop yang juga sebelumnya juga sudah saya postingkan untuk tipe postingan yang sama dengan judul karya Photoshop (1)

Nah berikut beberapa hasil karya menakjubkan mereka